Pages

Thursday, 27 September 2012

Midnight Mayhem themed cake

1 Comments


Another 21st birthday appears and I was approached to make a birthday cake themed Midnight Mayhem. The theme of the party was blacks, dark blues, silver and white, a reason to party hard into the the night. With those cues, and some things that the birthday boy and girl wanted , I created a Midnight Mayhem themed cake.

I wanted to use my new topsy turvy cake tin, and this was my first ever tiered cake.

Notes:
  • A topsy turvy cake is hard to make look topsy turvy. If you don't get certain heights, or angles, it just looks like a crooked cake.
  • A tiered cake is time consuming, and I only used one cake recipe and had a topsy turvy cake tin. In most topsy turvy cakes, each tier has a different flavoured cake, and several different sized cakes are made to obtain the topsy turvy look.
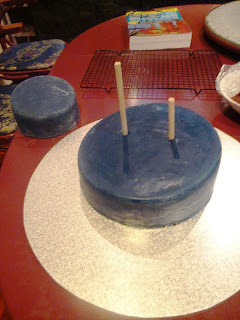
  • Cutting dowels to size and placing them through an entire cake is quite hard when you are going through layers of fondant, ganache and cake.
  • Rolling small balls of fondant is extremely tedious, probably won't ever do that for a cake trimming again. (Even with a friends help, it was tedious and time consuming)
  • I bought cake boards to sit underneath the cakes when covering with ganache and fondant, but removed the two smaller cake boards when assembling the cake.
  • The smaller cake board was used to measure the circle for the clock.
  • Edible paint is fun and easy to use. (Wear glovers, or else fingers become sparkly with gold or silver)
  • I used various sized cutters for my decorations (cats, bats, stars, moon). Most purchased from Glass House cakes: http://www.glasshousecakes.com.au/
  • The Thunder Cake recipe was made 4 times!!!
  • 900ml thickened cream, 600g milk chocolate (2 and a half blocks), 250g dark chocolate (1 block) for ganache. Of this remains approximately 2 cups.
  • To get a midnight blue colour: 
    • 2x 750g blue fondant
    • 100g black fondant
    • 100g red fondant100g black
      • (All Bakels Brand). Those are rough estimations, I kind of winged it to get the desired colour.
The Decorations:
  The fondant balls kind of looked like mochi


The Cakes:


The Assembly:


I did a rough calculation and this entire cake took roughly 21 hours, this was spread over three days and includes fondant colour prep, decorations, baking, cleaning time and assembling the cake. It was definitely a learning experience, and I now know how to make it better for next time. The birthday boy and girl were extremely happy with how the cake turned out and said 'it turned out a lot better than expected'. Thanks guys! xx

Good food, good times!

Saturday, 15 September 2012

Ladurée @ Westfield Sydney, Level 3

2 Comments


I heard about Ladurée opening in May, where it was supposed to be opened in July. Now, after months and months of waiting, the day finally came, the day that Ladurée opened. I was there on opening day (11/09/2012) at 10am, to only find out it would open at 12, and then 1, and then 2.30! My friend and I went back at 2, and they had already started selling, and the queue to buy macarons was extremely long. With that, we decided to queue in the in store cafe line (where we only had to wait 30 minutes) and able to dine in to enjoy macarons and buy some takeaway.

I have yet been able to go to France where the original store is, but I will one day. This is the closest I could get to experiencing the real thing. The macarons are a bit on the pricier end of the spectrum, but considering they are shipped from Europe, it is reasonable and worth it.


The flavours

The Store:

I guess Ladurée Sydney isn't quite a store, but just to make things easier it shall be described as one. The Ladurée store is surrounded with products they sell, ranging from bags, perfume, teas, jams, chocolates, gift boxes and of course the infamous macarons. At the top of all the display windows there are lovely tiered macaron boxes tied with ribbon or macaron towers. The gold trimmings around product labels and all the signage are very French chic. 


The cafe:

The cafe is located behind the store and has a lovely outdoor garden feel as it is surrounded with small hedges. The layout is basic with tables of 2 or 4, low back chairs and simple black tables providing an elegance of a high tea. Further displaying large  boxes of macarons and scented candles.


Tea & Macarons:

Tea and macarons are a few of my favourite things. The teas are named after famous French Monarchs, each with their own individual scent and taste. They allow you to smell each tea, and pick your favourite for a pot. Tea costs $7.50 per pot. I love how Ladurée place a little napkin on the tea pot handle, so simple, yet so elegant.


Marie Antoinette (background Roi Soleil)

I went to Ladurée with a uni friend, so we decided to get every single flavour available and halve it. Overall the texture of Ladurée macarons are exquisite and perfect. They are light, with the perfect chew, and an exceptional balance between macaron shell and filling. They are somewhat indescribable, but I can now sort of understand the hype and fame of Ladurée macarons (until I experience the original in Paris).


Plate 1 (clockwise from white):
Vanilla, Lemon, Chocolate, Almond and Coffee. 
We thought we would start with the basics. My favourite of these was the coffee. It has the taste of a perfectly brewed coffee. My friends favourite was coffee, and also lemon (one of her favourite desserts are lemon tart), it has an intense lemon taste, so if you like a little zest in your life, then lemon is perfect for you.


Plate 2 (clockwise from purple):
Blackcurrant, Strawberry Poppy, Raspberry, Salted caramel, Liquorice, Pistachio and Chestnut (middle). 
These flavours are a bit more on the exotic range of the spectrum. I enjoyed all of these flavours. The strawberry poppy was delectable, it wasn't too sweet like other strawberry macarons are and I think that is because of the poppy component. The subtle poppy flavour balanced the macaron, a definite favourite. This delighted both our taste buds.

My other favourite was the salted caramel. I have tried many salted caramel macarons and never been completely satisfied (part from La belle miette). However, at Ladurée there was the perfect middle point of salt and caramel, the best salted caramel I have tried in Sydney...to date.


Plate 3 (clockwise from green):
Almond marshmallow, Lemon Lime marshmallow, Strawberry marshmallow, Violet marshmallow.
As a part of the 150th anniversary, Ladurée created 4 new flavours to celebrate the homage of the world famous macarons. All of the macarons contained a marshmallow centre that wasn't too gooey or sticky. The lemon lime was a very unique flavour, where it tasted very similar to gatorade, quite intense. My favourite of all these was  the strawberry marshmallow (I also bought this flavour for 2 of my other friends and they loved it too). Just thinking about it is making me salivate, the strawberry flavour with a slight crunch due to the sugar on top, just wonderful. 


Upon second visit, I tried Orange blossom and Ghana Chocolate (bottom two) where there was a subtle hit in the orange blossom, and the ghana chocolate has a darker chocolate taste compared to the normal chocolate. I prefer the ghana chocolate over the normal chocolate.


Table of goodies

16 macarons, done and dusted

Complimentary chocolate (even the chocolates are labelled Ladurée)

Bags of macarons

Good food, good times!

Thursday, 13 September 2012

Blackjack/Casino Themed Cake

1 Comments


As a part of a joint friends 21st birthday celebration I was asked to make a cake. There were a few requirements for the cake:

1. Since it was 2 peoples birthday, it had to look/be 2 cakes.
2. It had to have the birthday theme which was casino.
3. Feed about 100 people.


After some late night Google search sessions, I finally came across a concept that was perfect for the occasion...Blackjack. I am not sure if people understood the cake, but it was Blackjack (since it was a casino themed) and when you get Blackjack it equals 21, which is how old they were turning. Inspiration came from: http://showusyourcakes.com/cakes/blackjack


For the cake, I used the Thunder Cake Recipe. I had to make two cakes, so the recipe was doubled/made twice (since I only had one cake pan, I could only bake one cake at a time). I used a rectangular cake pan that was larger than an a4 sized piece of paper (sorry but I don't know the exact specifications).

The ganache for the cake was 600ml cream with 600g chocolate (200g dark, 400g milk). I made the cake in the morning, of the day before the cake needed to be ready. So before any cutting or assembling was done, it had been refrigerated for about 6 hours.


Assembly
Stage one: Preparing


1. To make sure the cakes worked out, I scanned two playing cards (Jack and Ace) and enlarged them on a4 paper. I used them as my templates to how I wanted the cakes to be shaped, and for the outline of the cake.


2. The cakes were cut to shape. I put a little bit of ganache on the board before placing the cakes on, so that the cakes would be stable.


3. After getting the correct shape, I placed a crumb coat of ganache on the cake. Refrigerated for 2 hours.


4. Final coat of ganache, and then I evened out the cake and smoothed out the edges.


Stage Two: Decorating


The decorating of the cake was done on the morning of the birthday (since the party was hosted at night). I used the following products (most were purchased from Glasshouse Cakes):

  • Black buttercream icing tube (CK decorating icing 113g)
  • Yellow buttercream icing tube (CK decorating icing 113g)
    • To use the buttercream you will need an icing tip, I used one at home, but the lines were quite thick, so if you want thinner lines buy a smaller tip.
  • Red writing icing tube (from Woolworths)
  • White vanilla flavoured fondant
  • 18" square cake board and board


1. I traced the same two card print outs onto grease proof paper, and then traced those on to white fondant that I had rolled out, cut to a4 size and left to set (in a dry cool place away from any light).


2. To trace the image onto fondant, I used a blunt pencil so I didn't get any lead on the cake, but still had noticeable indents along the cake so I knew where I was decorating.


3. Using the black buttercream I started with the Ace of spades and traced along my lines made. Set aside.


4. Using the black buttercream again, I outlined the jack, and the patterned lines. I accidentally drew the line to far at the top, so to fix that I cut out that part of the fondant and flipped it over, and put it back together.


5. Using the red and yellow, I began to fill in the blanks of my outlines with the colours.


6. I carefully placed the ready made images onto the cake, and using the black buttercream, I outlined the outside of the cards.


7. For some final touches, I used white fondant to make out the birthday message. I stuck them on the board with some water. The box was then packed and ready to go.


The whole entire cake was finished on the night, with some people not being able to have a slice. The overall feedback on the cake was great, and it was definitely fun to make with only a few mishaps that definitely won't happen next time.

Good food, good times!

Vanilla brulee tarts with strawberry purée

1 Comments


A crazy amount of 21st birthdays have been approaching, and along with gifts, I like providing some sweet delights. In this case, I decided to make some tarts (I got a bit bored of making cakes). I have always wanted to make tarts, and I finally got around to it.

This recipe is by the famous Bourke St Bakery. Unfortunately, mine didn't taste as good, but I never expected them to. Furthermore, due to some time restrictions and not the greatest blow torch, I couldn't quite get the burnt sugar effect on top.

Also, lucky for me, my sister had a whole bunch of pastry left over from a previous tart she made so I didn't have to make the shortcrust pastry. But the recipe she used was   a Matt Moran, sweet shortcrust pastry as seen on MasterChef Australia: http://www.masterchef.com.au/recipes/sweet-shortcrust-pastry.htm


Vanilla brulee tarts with strawberry puree

Makes 20 (8cm tart)
**I used a large round tart pan (~23-25cm) and 5 small tart cases (8cm)


Ingredients

Vanilla Custard
720 ml of thickened cream
1 vanilla bean (or equivalent = 1 teaspoon vanilla bean paste)
10 egg yolks

80g (1/3 cup) caster sugar

Strawberry Puree

250g strawberries, washed and hulled
120g caster sugar


Method:
Vanilla Custard
1. In a saucepan combine vanilla into the cream.

2. Bring to the boil over high heat, as soon as it boils remove from the heat and set aside for 10 minutes.

3. Place egg yolks in a large stainless steel bowl. Add the sugar to the egg yolks and whisk until the sugar has dissolved.

 4. Pour the slightly cooled cream through a sieve over the egg yolks (discarding the vanilla bean pod - if used, and further removing any lumps.)

5. Whisk the mixture to combine.
6. Put the stainless bowl over a saucepan of simmering water, making sure the base of the bowl doesn't touch the water.

7. Continue stirring the mixture with a whisk for 10-15 minutes, or until smooth and thick - continually scrape sides of bowl with rubber spatula.
**NOTE: Do not stop mixing or the mixture will curdle (i.e. the eggs begin to cook).

8. Remove the bowl from the heat and whisk briskly for about 2 minutes to cool the mixture.
9. Once the mixture is off the heart, whisk the mixture every 10 minutes for 1 hour.

10. Place plastic wrap on top of the mixture and refrigerate over night.

Strawberry puree

1. Combine strawberries and sugar into a food processor (blender and hand stick blender will do the same job) until smooth.
2.  Wrap and refrigerate until needed. 

Pastry
1. Roll out the pastry until about 3mm thick. (using flour to prevent sticking)

2. Using the rolling pin, place the pastry into the case and pinch in the sides. Cutting off any excess pastry.
3. Refrigerate for 20-30 minutes.
4. Preheat oven at 190 degrees Celsius.

5. Place greaseproof paper over the top of the tarts, and fill with weighing beads (or uncooked rice)


6. Bake for 15 minutes.

7. Remove greaseproof paper and beads, and bake for another 10 minutes or until light brown.

8. Remove from oven and allow to completely cool before filling.


Assembly

1. Spoon about 3/4 teaspoon of strawberry purée into the base of the tart shell (that is for the 8cm cases, for the big tart I probably put equivalent to a few tablespoons).

2. Pipe the custard into the tart shells (this is so the strawberry purée stays in the centre). **NOTE: I just spooned the custard around the strawberry purée and put a dollop at the top, this works as well as long as your are gentle.

3. Smooth the top of the tart.

4. Refrigerate for 4 hours.

5. Sprinkle a teaspoon of caster sugar on top of the custard and burn with a blow torch until caramelised. (This step doesn't have to be done, but to get the full effect it is advised.)


Going on with the time restrictions, the custard in the big tart case didn't set as well as the custard in the small tart cases, but regardless, it was still tasty.


Good food, good times!