Pages

Showing posts with label Savoury Recipes. Show all posts

Sunday, 7 July 2013

Harry Potter Cake + 4th July Birthday Celebrations

9 Comments

Even though I am not American, American culture is a part of my life especially with films and tv shows. One of my closest friends loves the American Culture, and she has always been bugging me to celebrate an American Holiday. Therefore, as a group we decided to take advantage of Independence Day, and threw her a surprise 21st, American Independence Day Party.

 
We created a last minute American themed setting by all things red, blue and white. 

Hagrid Harry Potter Cake

The Feast

Independence Day Menu
- Mexican styled corn
- Fried Chicken
- Candied Yams (Sweet potato)
- Garden Salad
- Hagrid Harry Potter Cake with passion fruit ganache layers


Mexican Styled Corn
Corn on a cob
Japaneses Mayonnaise (Kewpie Mayonnaise)
Shredded Parmesan Cheese
Lime
Chilli Powder
Chopped coriander

Method:
1. Preheat oven to 200 degrees Celsius. 
2. Peel the skin off the corn and wrap in aluminium foil.
3. Place on a tray in the oven for 15-20. (on the middle to top rack)
4. Allow to cool for 2 minutes, and peel off aluminium foil.
5. Apply a drizzle of mayonnaise, pinches of parmesan cheese, coriander, squeeze of lime and sprinkle of chilli powder. 


Fried Chicken
1kg chicken tenderloins
2 cups Panko crumbs
3/4 cup Parmesan cheese
3 eggs
2 cups of flour
salt
pepper
cayenne pepper

Method
1. Heat oil in a pan enough for a shallow fry, to 350 degree Celsius.
2. Combine flour, salt and peppers in a large bowl.
3. Mix eggs in a separate medium bowl.
4. Combine panko crumbs and parmesan cheese.
5. Coat a piece of chicken in the flour mix, then the egg mixture and then the crumb mixture.
6. Once oil is heated, place chicken in the pan (no more than 3 pieces at a time). Allow one side to brown, once browned, flip the chicken and cook. 
7. Place the cooked chicken on a paper towel.


Candied Yams (Sweet potato)
3 medium to large sweet potatoes
50g butter
1 packet of mini marshmallows

Method:

1. Boil a pot of water on the stove with a pinch of salt.
2. Peel sweet potato and cut into even sized chunks.
3. Once water is boiled, at the potatoes and place on the lid. Leave until potatoes are cooked through. They are cooked through when a fork or a chopstick can go through the centre of the potato.
4. Drain the water and begin to mash the potatoes and add the butter.
5. Preheat oven to 200 degree celsius.
6. Place mashed potatoes into an oven proof dish, evenly spread out. 
7. Evenly spread the packet of mini marshmallows.
8. Place in the oven for 10-15 minutes until marshmallows have browned


Hagrid Harry Potter Cake

The Harry Potter Cake was made because the birthday girl loves Harry Potter. I first came across the Harry Potter Cake on Diamonds for Dessert. When I showed her, she said that one day I would have to make it for her, and that day had finally came.

I used the Thunder Cake Recipe for two 20cm round cake tins for the cake. As for the buttercream frosting, I followed Diamonds for Dessert recipe. 

To take advantage of the lovely passionfruit that are currently in season, in between the cakes was passionfruit ganache. The recipe was guided by Heston Blumenthal's chocolate gateau recipe

Passionfruit Ganache
175g thickened cream
Pinch of salt
Pulp from 6 passion fruits
110g of dark chocolate (broken into pieces)
50g milk chocolate (broken into pieces)

Method:
1. Combine cream, salt and passionfruit in a saucepan over medium heat until it comes to the boil. Remove from the heat and allow to stand for 5 minutes.
2. Place the chocolate in a bowl and melt until smooth. (I used microwave at 15 second intervals)
3. Strain the infused cream and add to the bowl of melted chocolate a third at a time. Making sure to completely incorporate the cream with the chocolate after each addition.
4. Allow the ganache to cool to room temperature and refrigerate until read to use.

Processes
- Split the butter cream to a majority in one bowl (colour pink), and a few spoonfuls in another bowl (colour green).  
- When the two cakes were cooled, I levelled them and then cut them in half. 
- I filled each layer with the passionfruit ganache (the levels weren't as uneven as the picture looks haha)
- Applied a crumb coat of vanilla butter cream
- Top coat of vanilla buttercream. The top coat doesn't have to be that neat since it is supposed to be made by Hagrid =D
- Final touches

The HAPPEE BIRTHDAE HARRY was supposed to be written with green tinted buttercream, however too much red food colouring was added to the split batch, therefore the rest of the white was used for the pink. I then tried to use white chocolate, and tint it with green food colouring which DIDN'T work at all.

Therefore, I ended up using white writing fudge from the tube, which I coloured green. I put that in a ziplock bag, and created a make shift piping bag for the writing. 

This became an issue when presenting the cake, as I did the piping several hours before consumption, the colour began to separate from the writing fudge. However, if you plan to serve the cake straight away, this way of colouring will work.

Just another birthday message for M. Happy 21st Birthday M! I hope that you and the girls enjoyed the dinner and dessert!

Good food, good times! 


Tuesday, 6 March 2012

Spanish Fiesta, well kind of...

0 Comments

Summer (well what was supposed to be Summer) has come to end, which means back to uni. With that in mind I thought to end the summer with a bang! Which originally was supposed to be a BBQ, but due to the dreadful weather it turned out to be a somewhat Spanish themed dinner.


What's on the menu:

> Sundried tomato and olive bread (from Costco)
Chicken Paella
Feta and eggplant meat balls

> Patatas Bravas (Spanish styled potatoes)
> Spanish chorizo sausages (bought from Rodriguez's bros in Yagoona)
> Mango and tomato salsa
> Mixed leaf, beetroot and nectarine salad

Chicken Paella

When I made the chicken paella this time around it turned out quite different. I made the following changes:
> Used 1.4kg of cut thigh fillets
> 500g of aborio (which is about 2 and a bit cups)

Due to those 2 changes, it was a bit more dry, even though throughout some of the processes I added more chicken stock. The colour was also different. Either way the smell and taste of the dish was still there, just that second time (right) , it didn't turn out quite as flavoursome as the first time (left). 


Patatas Bravas

Patatas bravas are Spanish styled potatoes, the reason they are Spanish is due to the sauces that the potatoes are eaten with. One sauce is a garlic aoili, and the other is similar to a spicy tomato salsa. The restaurant Encasa does these really well, which inspired me to give it a go.

Ingredients (recipe guided by how to cook perfect patatas bravas )

500g waxy potatoes (I used golden delight potatoes, and chose small ones that were roughly the same size which made them easier to cut and cook evenly)
Olive oil
1 small onion, finely chopped
1 red chilli, finely chopped
400g tin chopped tomatoes
1/2 tsp sugar
1/2 tsp salt
1 tsp smoked
2 tbsp balsamic vinegar
Salt
Pepper

Method:

1. Pre-heat oven to 200 degrees Celsius.
2. Peel, wash and cut the potatoes into 2-3cm chunks. 
3. Place in a roasting tray, and drizzle with olive oil, salt and pepper.
4. Bake for 50 minutes or until crisp and golden.

For the sauce (tomato based)

1. Place a splash of oil in a heavy bottom pan on a medium heat and cook the onion until golden and soft.
2.  Put in the chilli, and cook for a few minutes.
3. Add tomatoes, sugar, sale and smoked paprika and stir well.

4. Bring to the boil and turn down to a low heat so simmer for about 20 minutes until thick and dark.
5. Take off heat, add balsamic vinegar and stir.

I cheated and instead of making my own aoili (garlic mayonnaise) I bought some. Also I wasn't sure if my friends would have liked the sauces so I placed them in separate bowls. I also doubled the recipe, which means the potatoes took twice as long to cook, but turned out to be the best potatoes I have ever roasted! Crispy on the outside, and soft and fluffy on the inside.


Mango and tomato salsa

Ingredients (4-6 people/sausages)
1 large mango
2 roma tomatoes, halved, deseeded
1/2 red onion
1 chilli, halved, deseeded
Lime juice
Olive oil

Method:

1. Peel the mango, and remove the cheeks and slice into 5mm pieces. (Practically a finely sliced consistency).
2. Slice the tomatoes to a similar size to the mangoes, and finely chop the red onion.
3. Finely slice the chilli.
4. Place it all in a bowl, drizzle a little bit of lime juice and olive oil and stir well.


I doubled the recipe when I made it. Furthermore, I purchased both normal and spicy chorizo sausages from the butcher and the salsa worked extremely well with both. The sweetness of the mango, with the hint of chilli, and the flavour filled chorizo was absolutely mouth watering. 


What a feast! This fed a party of 10, with some food still left over. I am pretty sure that everyone enjoyed all the food and it was a great way to celebrate a rainy night in with warm and cosy food. 


Good food, good times!


Wednesday, 15 February 2012

Birthday Dinner Party

3 Comments

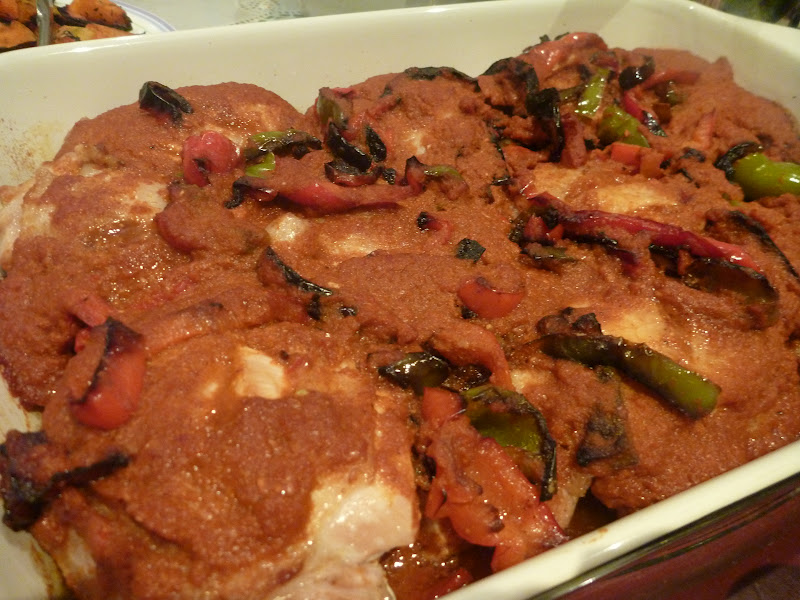
As a VERY late birthday present I owed my friend Lisa a home-cooked birthday dinner and that is what I made and invited 2 of our other close friends over for a lovely meal. After a few weeks of thinking of what to make I decided on the following things; Cheese & chive soufflé, piri-piri chicken (by Jamie Oliver) sided with roast pumpkin, mixed leaf, beetroot, nectarine & grapefruit salad, and for dessert vanilla panna cotta with a blueberry jelly and sauce.
Cheese and Chive Souffle (serves 4-6)
Ingredients
  • Melted butter, to grease
  • Dried (packaged) breadcrumbs, to dust
  • 30g butter
  • 2 tbs plain flour
  • 310ml (1 1/4 cups) milk
  • 80g (1 cup) coarsely grated cheddar
  • 1/4 cup finely chopped fresh chives
  • 4 eggs, separated

  • 1. Place a baking tray in the oven and preheat oven to 200°C. Lightly grease ramekins (including the rims) with melted butter and dust with breadcrumbs. (Depending on the size of your ramekins depends on how many soufflés the recipe makes)
2. Using a medium saucepan, melt the butter (30g) until foaming (not burning or caramelising). Add the flour, stirring and cook for approximately 2 minutes, or until mixture begins to bubble and comes away from the sides of the saucepan. Remove from heat.
3. Whisking constantly with a balloon whisk, gradually pour in the milk until mixture is smooth and combined.
4. Place the saucepan back on medium heat and bring to boil, stirring constantly with a wooden spoon until the sauce thickens. Remove from heat. (This step is a bit difficult to determine, so what I did was judging from how the liquid ran along the back of the wooden spoon). Set the mixture aside to cool for a few minutes.
5. Add the cheddar, chives and egg yolks, and stir until cheddar melts and the mixture is well combined. (Add the yolks one at a time and stir straight away to avoid the eggs from curdling.)
6. Use an electric beater, beat the egg whites in a clean, dry bowl until firm peaks form. Fold in one-third of the egg white to the cheese mixture until just combines. Add the remaining egg white mixture until just combined.
7. Pour the souffle mixture into prepared ramekin. (Ensure you do not drop any mixture on the rim of the ramekins as this will result in the soufflé sticking and not popping up like a top hat)
8. Place souffles on pre-heated baking tray and back for 15-20 minutes or until golden brown and puffed. ( soufflés  are best when they are slightly runny.)
9. Remove from oven and serve immediately.


**NOTE: My souffle got stuck to the sides of the rim because the original recipe said to run something along the rim to get the top hat effect, which resulted in the removal of the breadcrumbs and NOT getting the top hat effect. And it was a bit over cooked.

Piri-Piri Chicken - Serves 4 (Recipe from Jamie Oliver - 30 minute meals)

I doubled the original recipe so it was 2 pieces per person, it depends on what sides you are having and how hungry the people you are feeding are.

Ingredients (original recipe)
4 large chicken thighs, skin on and bones in
1 red capsicum (sliced into strips)
1 yellow or green capsicum (sliced into strips)
6 sprigs of fresh thyme

Piri-piri sauce
1 red onion (roughly chopped)
4 cloves of garlic
1-2 bird's eye chillies
2 tablespoons sweet smoked paprika
Zest of 2 lemons
4 tablespoons white wine vinegar
2 tablespoons Worcester sauce
large bunch of basil

Piri-piri sauce:
In a blender add all the piri-piri sauce ingredients, and blitz until smooth. Add a bit of water (no more than 1/4 cup) for a smoother sauce. Leave aside.

Chicken:
1. Pre-heat oven to 200 degrees Celsius. And put a large griddle plan on a high heat.
2. Slash the chicken a few times on each side. Drizzle with oil and season with salt and pepper. Put on the griddle pan, skin side down. Cook until golden and turn over.
3. Add the sliced capsicum to the pan. Turn the heat down to medium and keep moving the capsicums around until softened.
4. Place the chicken in a roasting tray, laying the capsicums on top. Pour the ready made piri-piri sauce on top.

5. Scatter sprigs of thyme on top of the sauce and place in the middle of the oven.
6. Cook for 15-20 minutes or until cooked through.

Salad
Mixed leaves salad bag
1-2 nectarines
1 pink grapefruit
1 can of beetroot wedges.

1. Cut the nectarine in half, to remove the seed and slice.
2. Peel the grapefruit, (including the inner skin) and cut into wedges.
3. Drain the can of beetroot.
4. Combine all into a salad bowl.


Roasted Pumpkin
Pumpkin - approximately half (I used Kent, but if you prefer other pumpkin then use them.)
Olive oil
Salt & pepper
Rosemary (or mixed herbs)

1. Pre-heat oven to 200 degrees Celsius.
2. Line a baking tray with grease proof paper.
3. Peel the pumpkin and cut into wedges. (All roughly the same size so they cook evenly)
4. Place the pumpkin on the baking tray and drizzle with olive oil, and season with salt, pepper and rosemary.
5. Bake in the oven (on middle or highest in the oven) for at least 1 hour, or until tender.

**NOTE: The base of some of my pumpkin pieces burnt because I forgot to rotate and move the tray to a different level in the oven.


Panna Cotta (with a blueberry jelly)

There is 2 ways to make this; you can either make it so you turn out the panna cotta on a plate or that you eat the panna cotta out of a ramekin or cup. In this case I made it so I turned it out onto a plate. If you make it the other way, then make the panna cotta first, and then the blueberry jelly.

Panna cotta
  • 3 teaspoons powdered gelatine
  • 1 cup thickened cream
  • 3/4 cup buttermilk
  • 1/4 cup caster sugar
    1/2 teaspoon vanilla bean paste

Blueberry syrup
  • 2/3 cup caster sugar
  • 1/2 teaspoon vanilla bean paste
  • 125g blueberries

Blueberry Jelly
1/3 cup of blueberry syrup
1 teaspoon of gelatine


Blueberry Syrup

1. Start by making the blueberry syrup. Place sugar, vanilla bean paste and 2/3 cup of cold water in a saucepan over a medium heat.

2. Lightly stir for 3 minutes or until the sugar dissolves (don't boil).

3. Reduce heat to low and simmer for 7 minutes or until slightly thickened.

4. Add blueberries, and simmer for 5 minutes, or until berries start to collapse.

5. Remove from heat, and cool for 10 minutes.
6. Pour into a bowl and refrigerate until ready to serve.

Blueberry jelly
1. Lightly grease four 1/2 cup - capacity moulds with non stick spray. (Similar to these moulds)

2. Strain 1/3 cup of blueberry syrup into a jug (or bowl).

3. Sprinkle over 1 teaspoon of gelatine and whisk immediately until gelatine dissolves. 

4. Pour mixture evenly amongst prepared moulds, and cover with plastic wrap.

5. Refrigerate for 1 hour or until set.

Panna cotta

1. Place cream, buttermilk and sugar in a saucepan over medium-low heat. Cook, by stirring for 6-8 minutes, or until simmering (don't boil).

2. Stir in vanilla bean paste, and pour mixture into a heat proof bowl.
3. Sprinkle of gelatine, one teaspoon at a time and whisk immediately. (This is to avoid the gelatine from clumping). Set aside to cool for 15 minutes.

4. Take prepared moulds out of refrigerator and check is jelly has set.

5. Carefully pour buttermilk mixture, over the back of the metal spoon into each mould. Cover with plastic wrap and refrigerate for 4 hours or until set.
6. Turn out the pannacotta and spoon over blueberry syrup and serve.

**As you can see, my blueberry jelly didn't turn out quite right (there was meant to be a layer of jelly on top, then panna cotta), but still tasted nice!

**NOTE: If the jelly has not completely set through, but the top has, pour a few teaspoons of the buttermilk mixture on top (just to cover the jelly) and place in the freezer for 15-30 minutes (this is to avoid the blueberry jelly from running through the pannacotta). Once that layer of pannacotta has set, you can continue to pour more of the buttermilk mixture and refrigerate.

Turning out the pannacotta
There are a few ways to do this, but the easiest way is shown by a helpful hint provided by taste, titled How to turn out panna cotta. Another way to turn them out is to run a round bladed knife around the pannacotta and hope they turn out onto the place. You can also run a blow torch around the moulds to loosen the panna cotta and gently tap it against the place.

Overall the dinner turned out great, and everything was eaten! The panna cotta was definitely the highlight as it was my first time making it, and it was quite a success (despite the blueberry jelly). I really hope all my friends enjoyed the dinner! And another late birthday shout out to my lovely friend Lisa! HAPPY BIRTHDAY LISA!


Good food, good times!

Wednesday, 7 December 2011

Dinner Party

3 Comments

One week of holidays had passed and I had the urge to cook and bake. And with that thought, I invited a group of friends over to enjoy some nice home cooked food, especially for a rainy day, when we were supposed to play oz tag. I had the help of a few friends to make this dinner a success, with both the making and eating.


After a few hours of thinking, I finally decided on a dinner menu composed of:
> Feta and eggplant meatballs with tzatziki (recipe by Donna Hay)
Jools Pregnant Pasta
> Salad
> Apple and strawberry crumble cake


Feta and eggplant meatballs with tzatziki (Makes roughly 36)
400g eggplant (aubergine), finely chopped
3 tablespoons olive oil
500g mince beef
1/3 cup chopped parsley leaves (flat-leaf parsley can also be used)
1/3 cup chopped mint leaves
2 cloves garlic, crushed
1 tablespoon of lemon zest
200g of crumbed feta 
sea salt and cracked black pepper
lemon wedges to serve

Method:
1. Preheat oven to 180C. Place the chopped eggplant on a baking tray and drizzle with oil and toss to coat. Roast for 30 minutes or until golden. Remove from oven and allow to cool.

Pre-cooked egg plant

2. Place the eggplant, mince, parsley, mint, garlic, lemon zest, feta, salt & pepper in a bowl and mix until well combined.


3.
Roll tablespoons of the mixture into balls.


4. Place oil in a large non stick frying pan over medium heat. Add the meatballs and cook for 3-4 minutes of until browned.


5. Place meatballs on a baking tray, and place in oven and cook for another 5-6 minutes or until cooked through.

6. Serve with tzatziki and lemon wedges.

Finished product
**NOTES**
+ The meatballs can be made in advance and refrigerated until it is ready to be cooked and served
+ Once cooked, I find that the meatballs can be eaten hot or even somewhat cold with the taste still being great.

Tzatziki (Makes 2 1/4 cups)
2 cups (560g) thick Greek-style yoghurt
1 Lebanese cucumber, seeds removed and grated
2 tablespoons of chopping mint leaves
1 clove of garlic, crushed
1/2 teaspoon ground cumin
sea salt and cracked pepper
lemon

Method:
1. Place all the ingredients in a bowl and stir to combine. 
2. Refrigerate until ready to be served.
3. Squeeze a wedge of lemon before serving to give it an extra kick.

**NOTES**
+ I strained the yoghurt through a thin cloth to remove some of the excess liquid.
+ I removed the seeds from the cucumber to further reduce the amount of liquid that may be present.

Apple and Strawberry Crumble Cake200g butter, at room temperature
  • 155g (3/4 cup) caster sugar
  • 2 tsp vanilla essence
  • 2 eggs, at room temperature
  • 150g (1 cup) self-raising flour
  • 150g (1 cup) plain flour
  • 185ml (3/4 cup) milk
  • 1 Granny Smith apple (green one), peeled, cored, thickly sliced
  • 200g strawberries, washed, hulled, halved

  • Crumble topping
  • 75g (1/2 cup) plain flour
  • 50g chilled butter, chopped
  • 55g (1/4 cup, firmly packed) brown sugar

Method:

1. Lightly grease a round 20cm springform pan with non-stick spray (or melted butter) and line the base with non stick baking paper.
2. Preheat oven to 180C.
3. Use an electric beater to beat the butter, sugar and vanilla in a bowl until pale and creamy. Add the eggs, 1 at a time, beating well after each addition.

4. Shift in flour into the butter mixture.
5. Using a spatula fold in flour and milk until well combined.
6. Spoon into the prepared pan. Use the back of the spoon to smooth the surface. Arrange the apple and strawberry on top.


7. 
To make the crumble:

Place the flour and butter in a bowl. Use your fingertips to rub the butter into the flour until the mixture resembles coarse breadcrumbs. Stir in the sugar.
8. Sprinkle the crumble topping over the apple and strawberry.


9. Bake in oven for 1 hour 10 minutes or until a skewer inserted into the centre comes out clean.
10. Set aside in the pan for 10 minutes before transferring to a wire rack to slightly cool. Serve cake warm or at room temperature.


**NOTES**
+ You can bake the cake in advance and heat up each slice before serving for a few seconds.

+ Serving the cake with ice-cream, custard or cream can add a little more of a sweet touch.
+ Recipe from taste.com.au

This whole entire meal fed 10 people with great feedback on how good the meal was. It was a meal for the masses, without the expensive cost. Thanks to all those who came and ate, and to those that helped make it a success.

Good food, good times!